


Rich and creamy peanut butter cream cheese filling combines with chocolate whipped cream, a 2 ingredient Oreo crust, and a chocolate drizzle topping in this simple but decadent no-bake chocolate peanut butter pie!
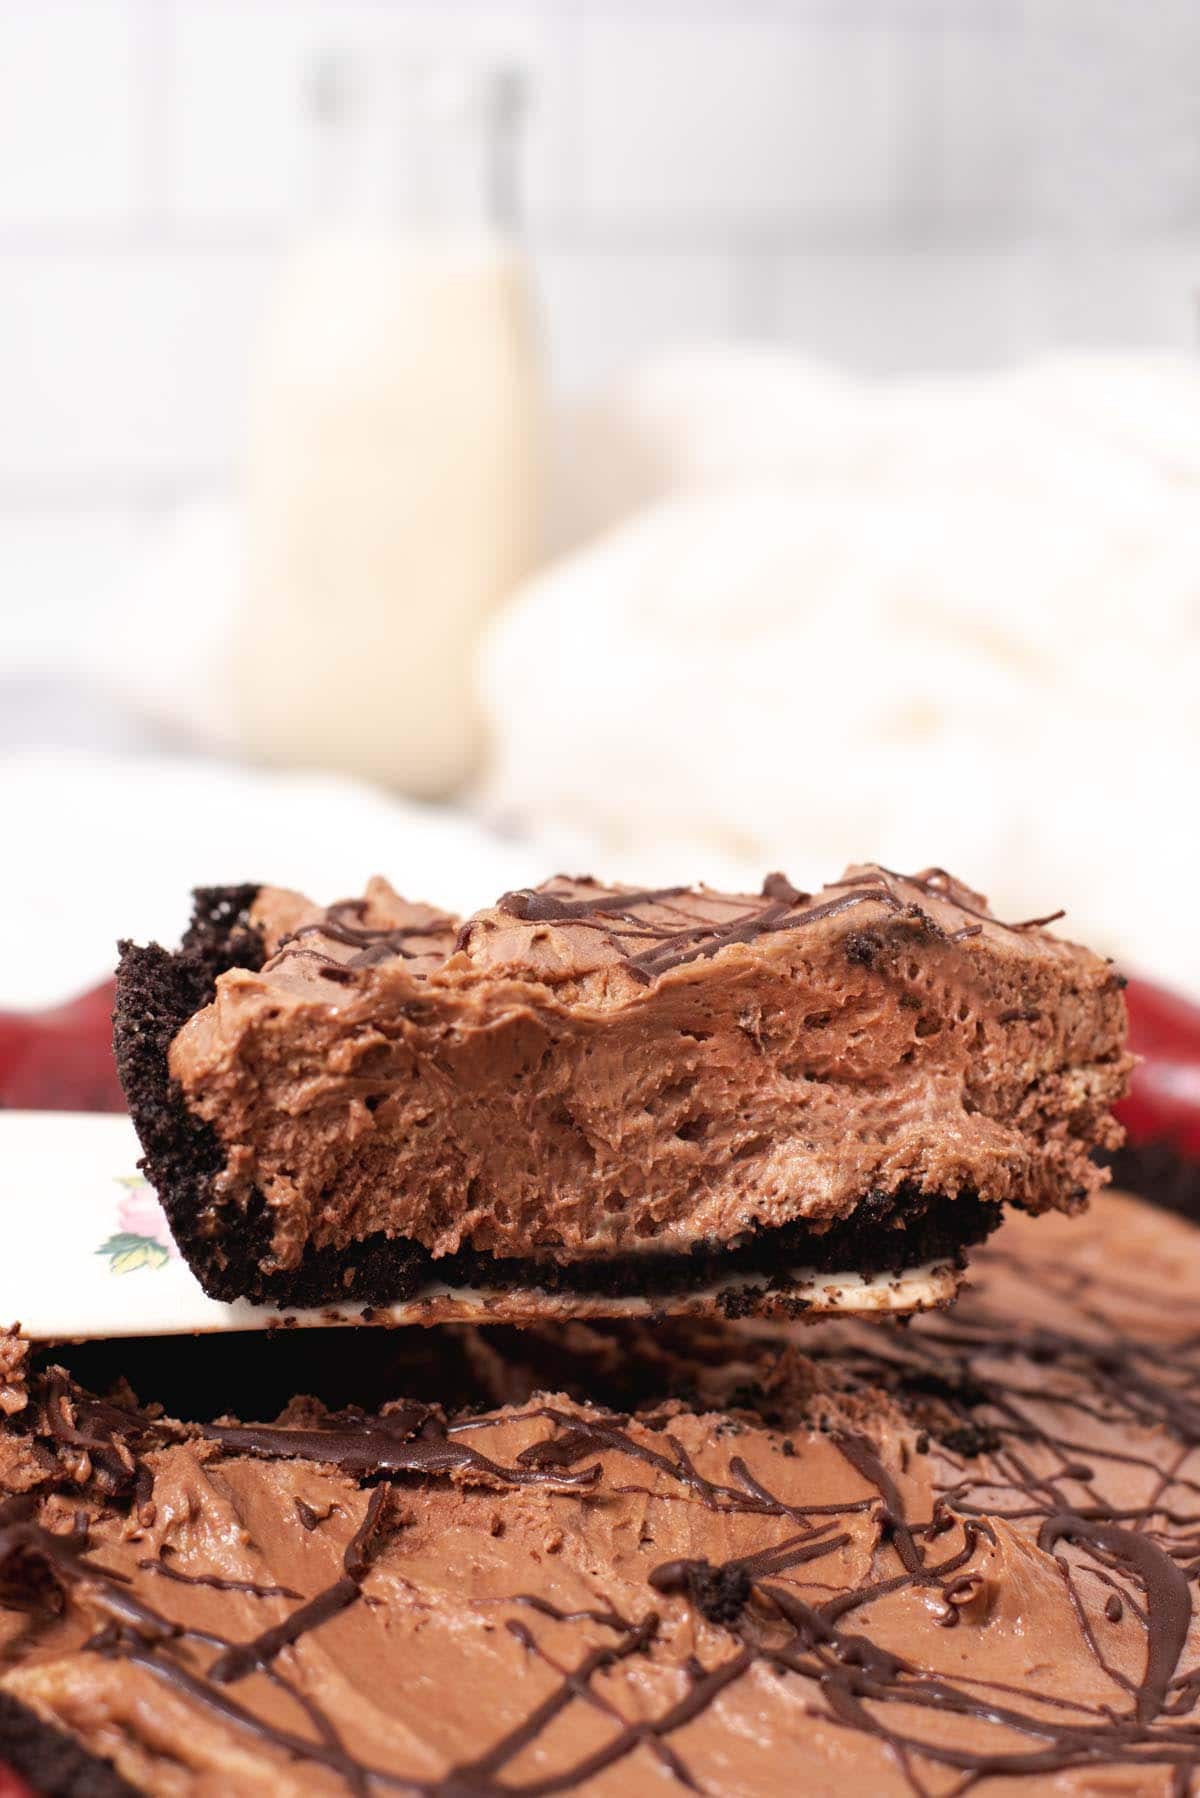
Chocolate peanut butter pie is a rich no-bake dessert that's made with a fluffy peanut butter and cream cheese filling. In case an Oreo crust wasn't enough, we're adding chocolate whipped cream and a chocolate drizzle on top to make this a double chocolate peanut butter pie!
Just like my double chocolate chip cookies and dark chocolate brownies, this peanut butter pie packs a super chocolatey punch. If you love chocolate, this recipe is for you!
We are sticking with mostly classic peanut butter pie ingredients for this recipe.
The main difference is that we are using homemade whipped cream in place of cool whip. But don't be intimidated: whipped cream is surprisingly easy to make, especially if you have a stand mixer.
Jump to:
Recipe at a glance
- Rich, chocolatey, and beyond creamy
- No baking required!
- Made with a 2 ingredient Oreo cookie crust
- Can be made in advance and frozen
Ingredients
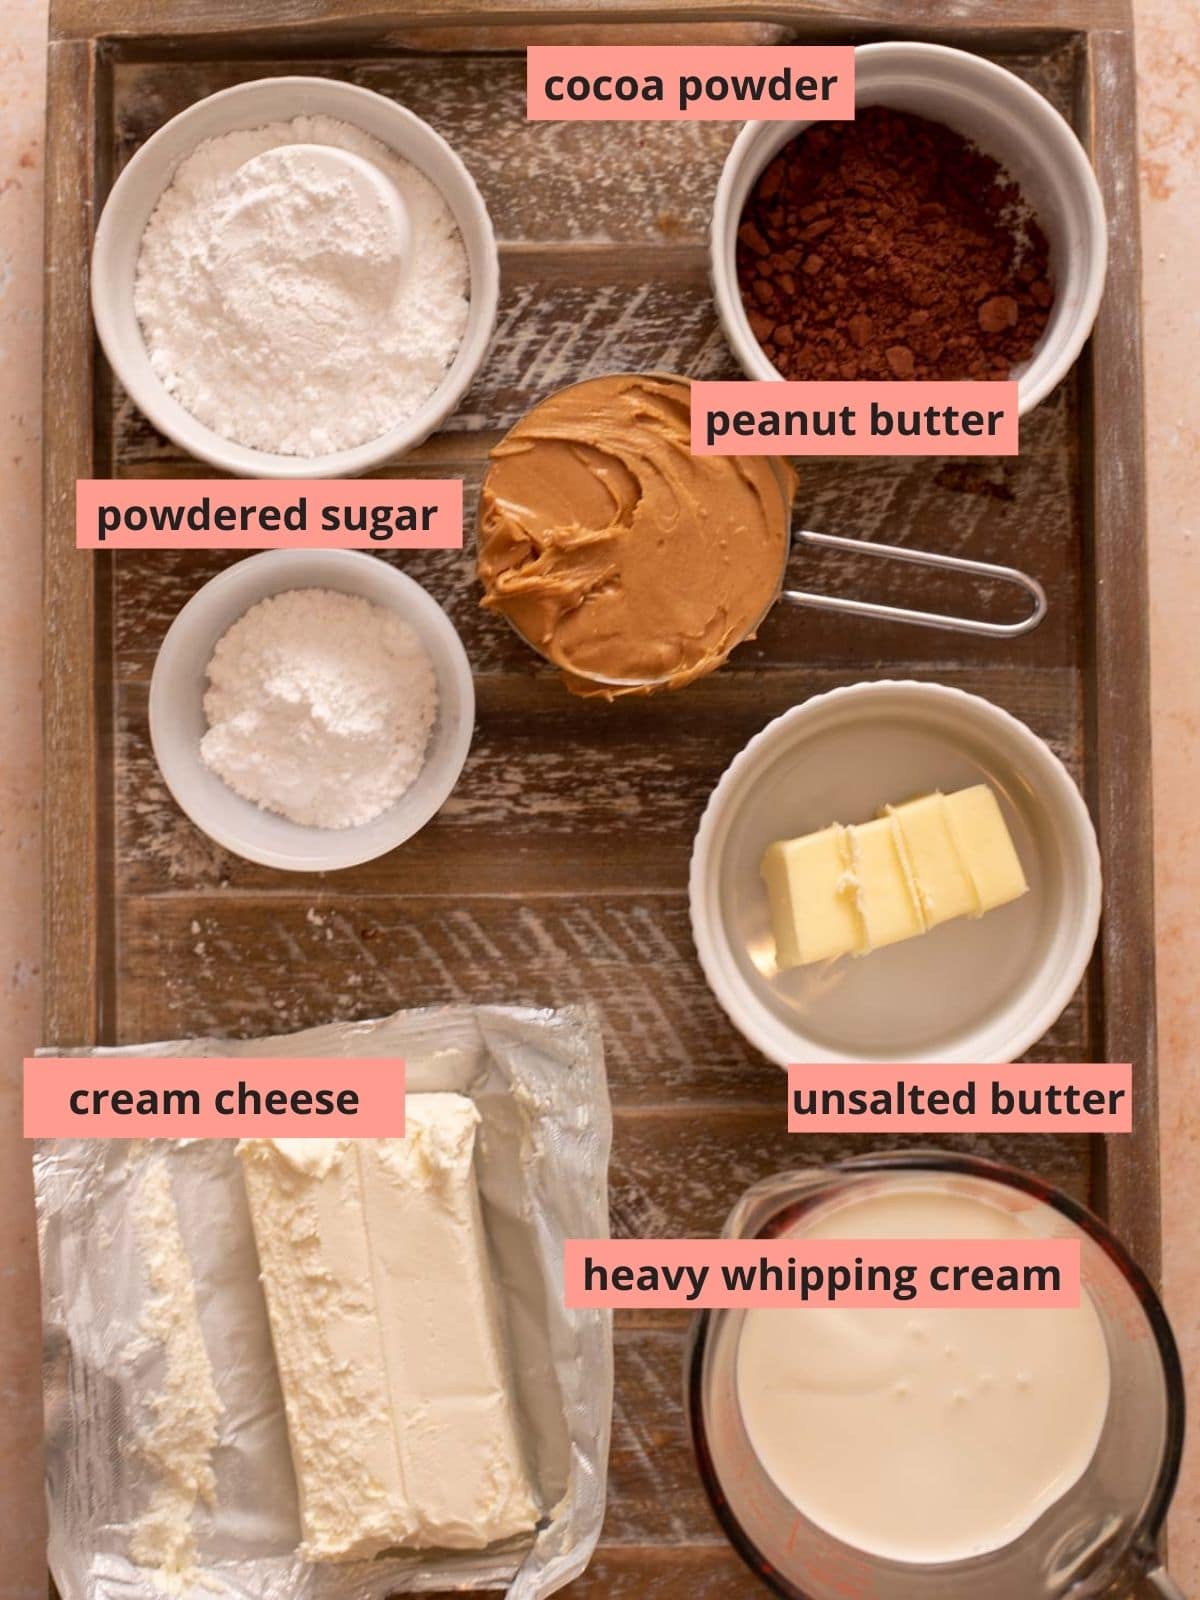
- Chocolate whipped cream is made using heavy whipping cream combined with cocoa powder and powdered sugar. Choose cream labeled heavy whipping cream, not just heavy cream.
- Peanut butter: Peanut butter pie actually works best with classic peanut butter, not the natural kind. This is because the oil separation in natural peanut butters can cause problems with the pie texture. In the video I use Jif "natural" peanut butter but I don't consider this a true natural peanut butter because it contains more than just peanuts and oil and the oil and peanuts don't separate.
- Cream cheese: I haven't tried this with a reduced fat cream cheese but I do think it would work.
- Oreos and butter make the oreo pie crust. You can use a store bought oreo crust or graham cracker crust if you want to cut down on prep time.
Oreo crust instructions
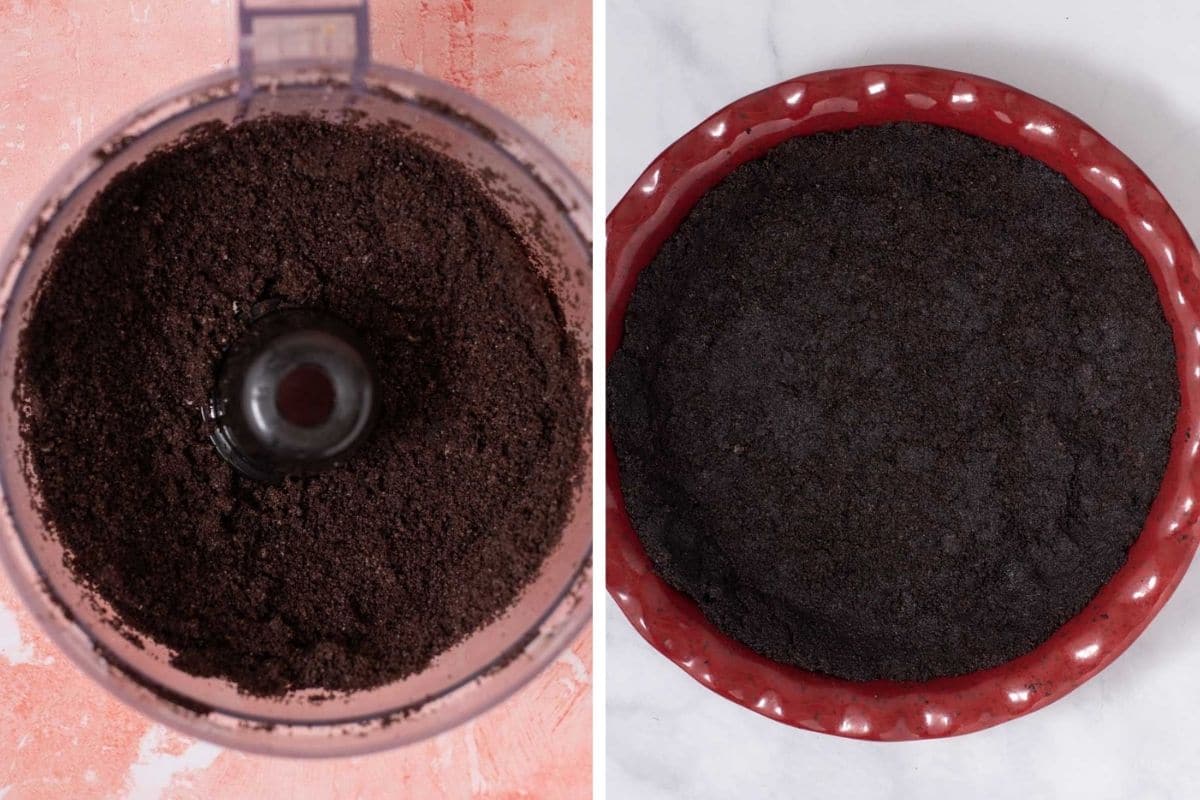
Add 24 Oreos (that's half of a family-sized package) to a food processor (this is the one that I use).
Pulse until the Oreos are broken down into crumbs. Transfer to a medium bowl with 4 tablespoons melted butter.
Mix together butter and oreos with a fork until mostly combined. Transfer to a 9" pie plate and pat into an even layer on the bottom and up the sides of the dish to form a crust.
Refrigerate for at least 15 minutes before using to allow the oreos and butter to firm up.
Don't have a food processor? Add the Oreos to a ziploc bag. Roll a rolling pin or jar of tomato sauce to break down the Oreo crumbs as best as you can.
Chocolate peanut butter filling
Making the whipped cream
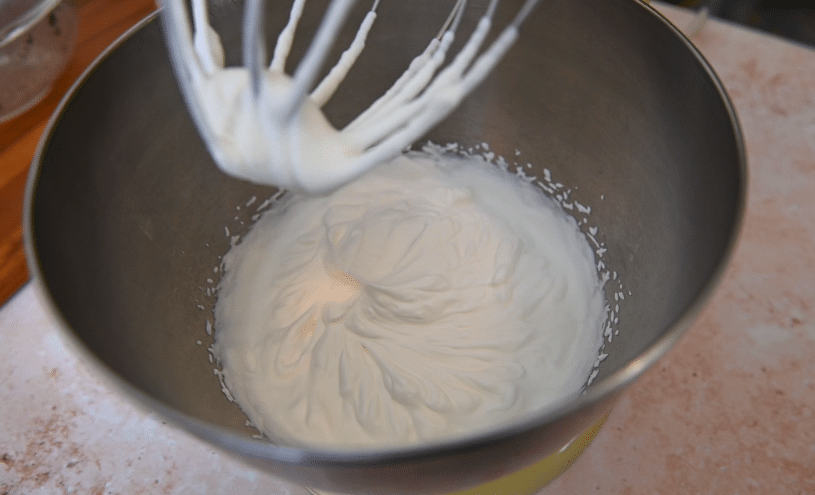
In a stand mixer with the whisk attachment, add 1 cup of heavy whipping cream. Whip on medium-high speed until you reach soft peaks, about 1.5 to 2 minutes. You can tell it is soft peaks because the cream will mostly stand up but will droop over a little at the top.
I use a very old Kitchenaid stand mixer but I've used newer models a lot and, of course, a new stand mixer works if you don't have your grandma's old mixer.
Sift in the powdered sugar and cocoa powder. The corn starch in powdered sugar acts as a stabilizer for the whipped cream.
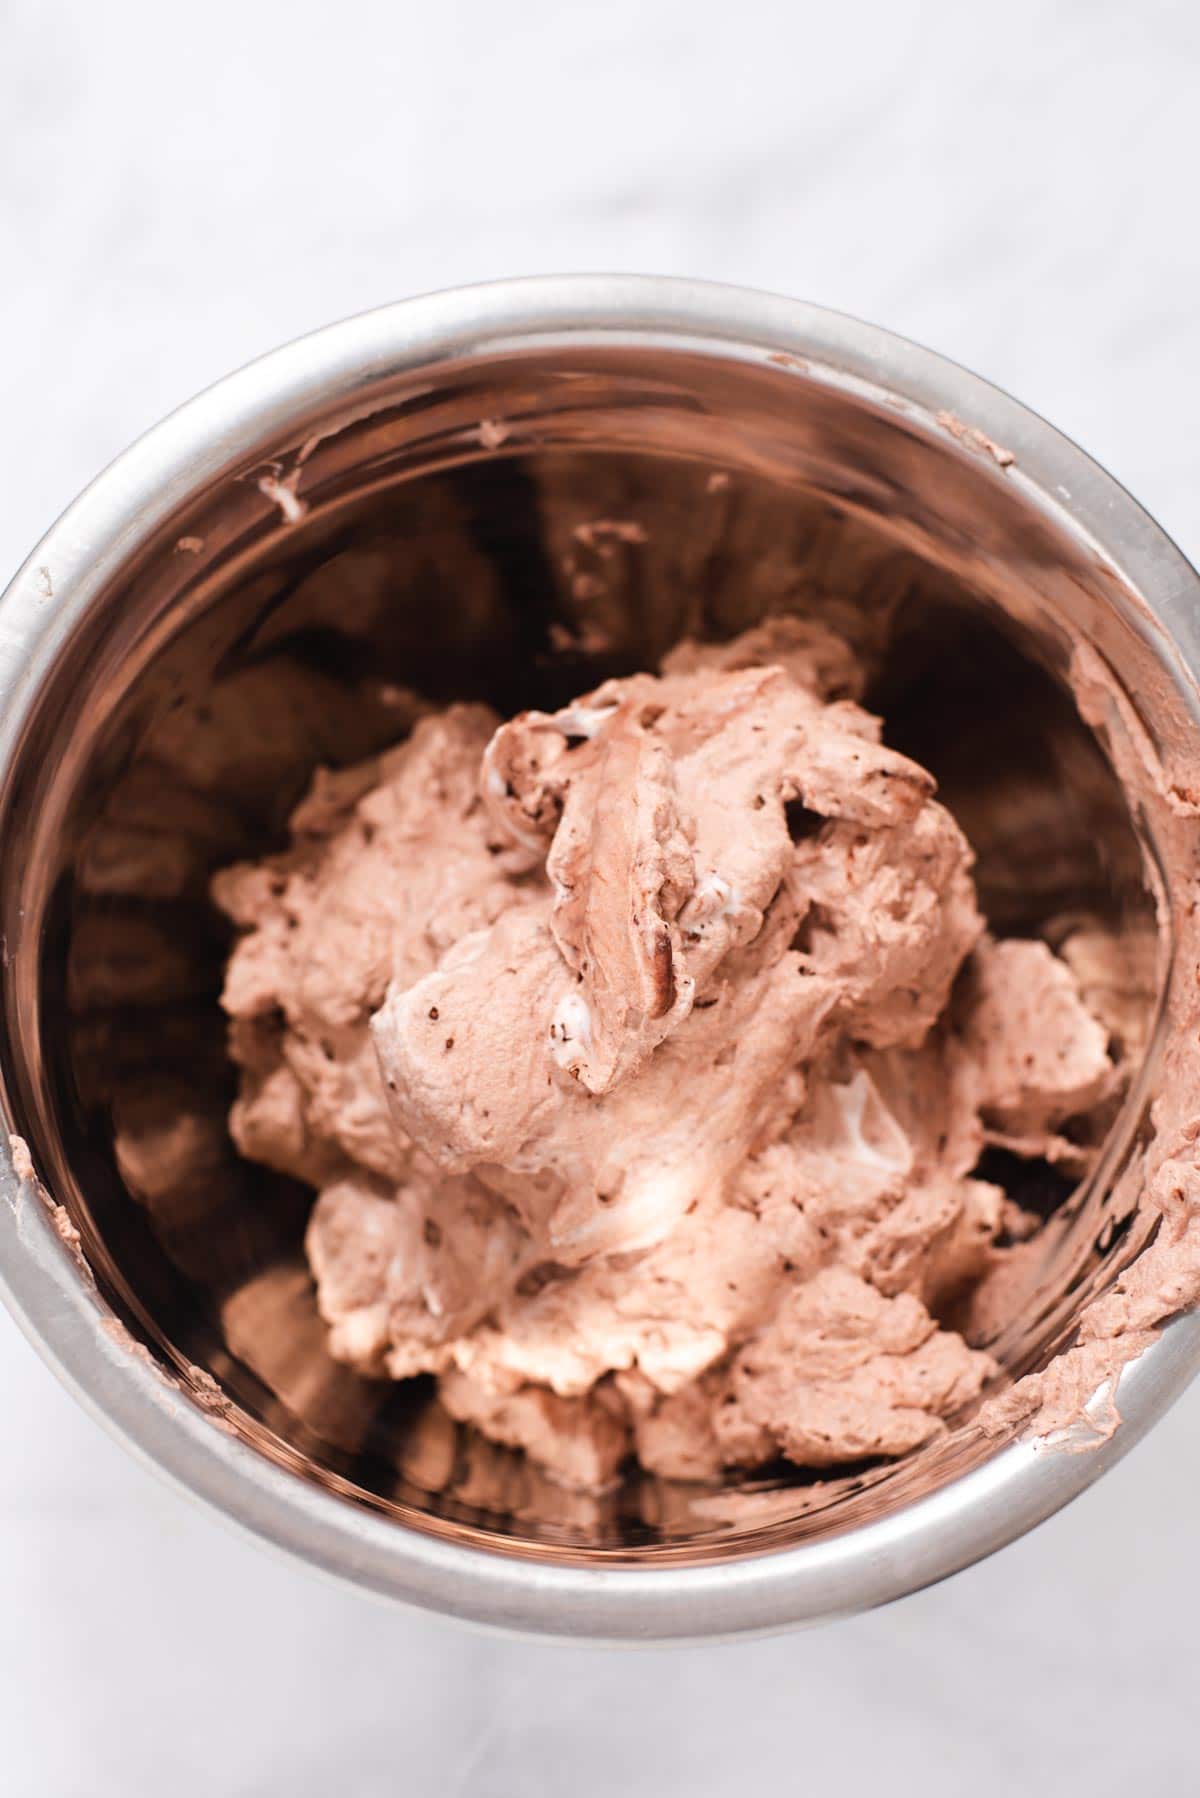
Continue whisking on medium-high speed until you reach stiff peaks. The whipped cream will hold its shape when lifted up but will still be light and fluffy. Gently transfer whipped cream to a bowl and place in the fridge until ready to use.
Don't have a stand mixer? You can use a hand mixer with a whisk attachment but it will take a little longer. You can also whisk by hand but it will take some elbow grease.
Making the filling
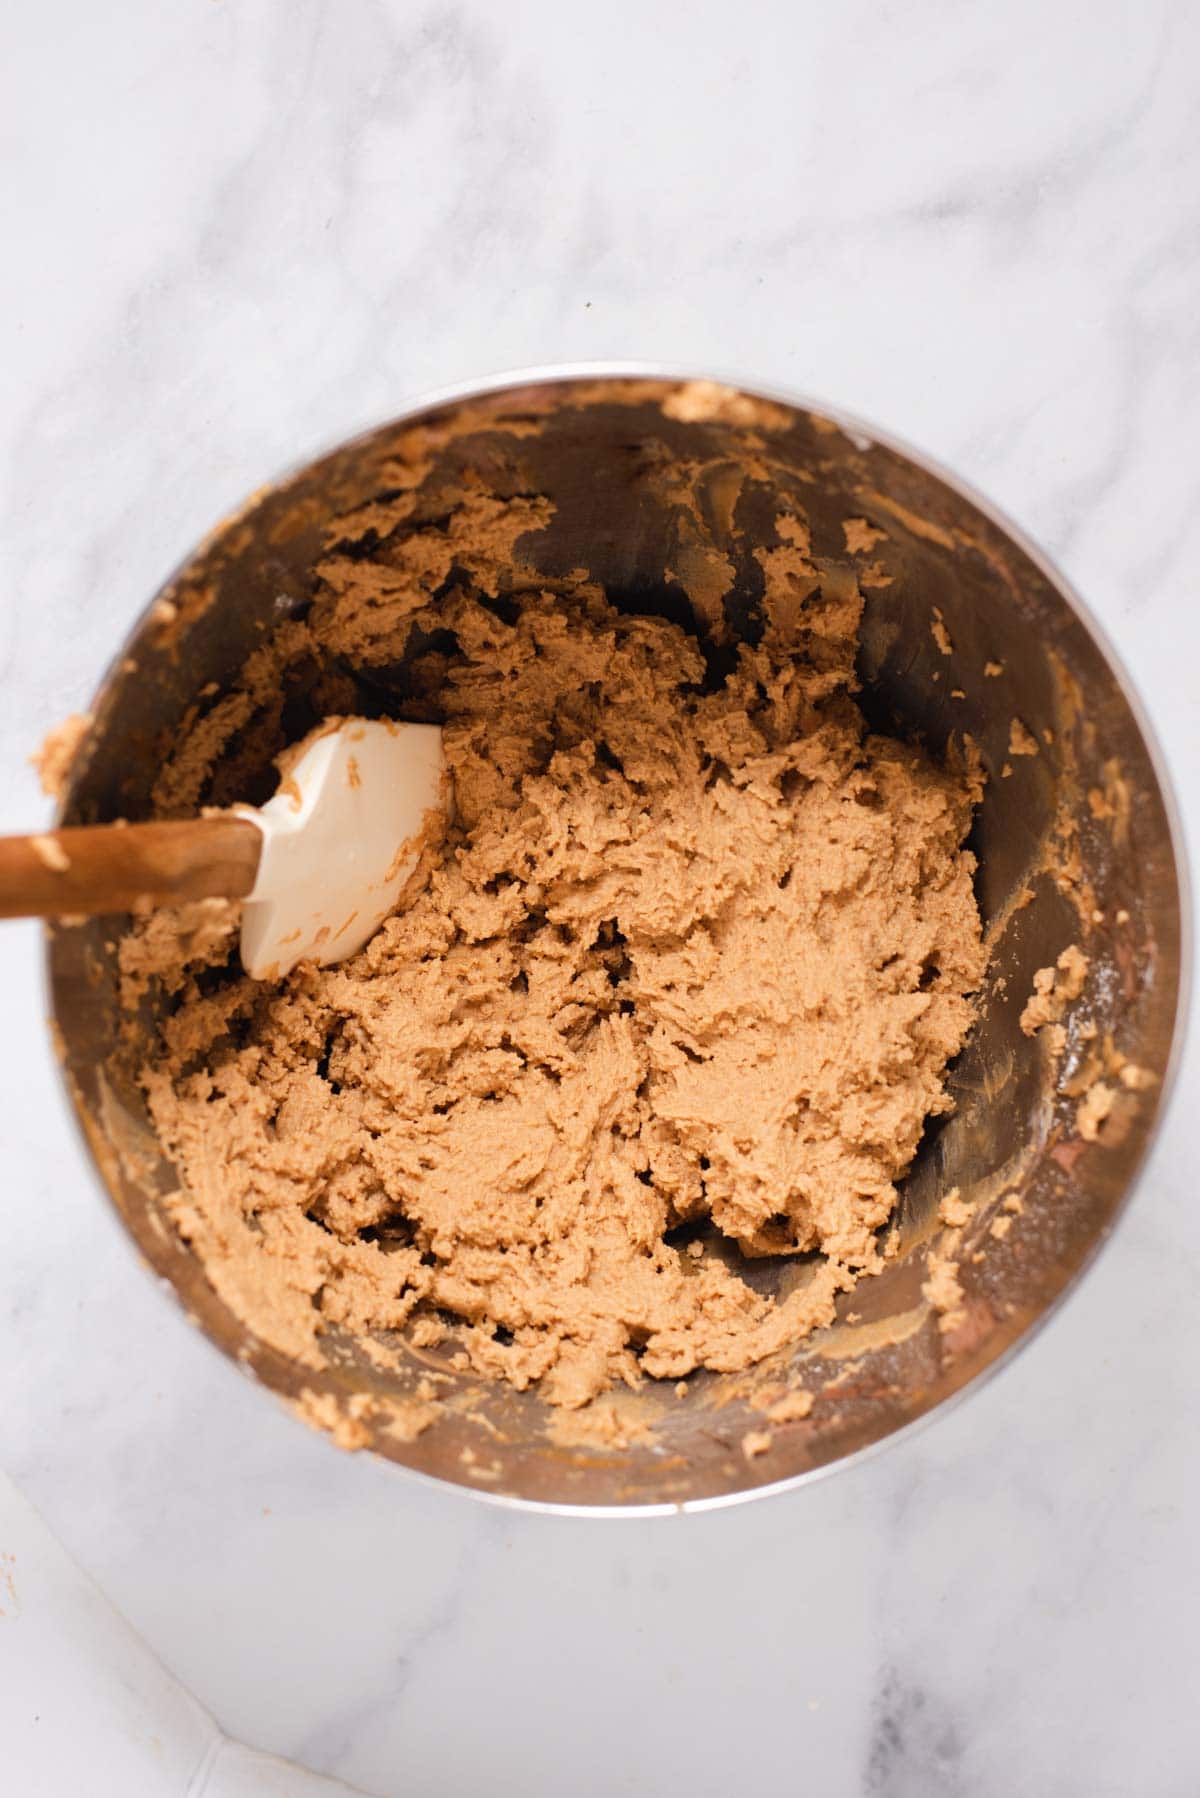
To the same bowl you used to make the whipped cream, add the cream cheese and peanut butter. You don't need to clean out the bowl between steps.
Cream together on medium speed, scraping down the sides as needed.
Once combined, add the powdered sugar, whisking with the mixer until fully combined (image above).
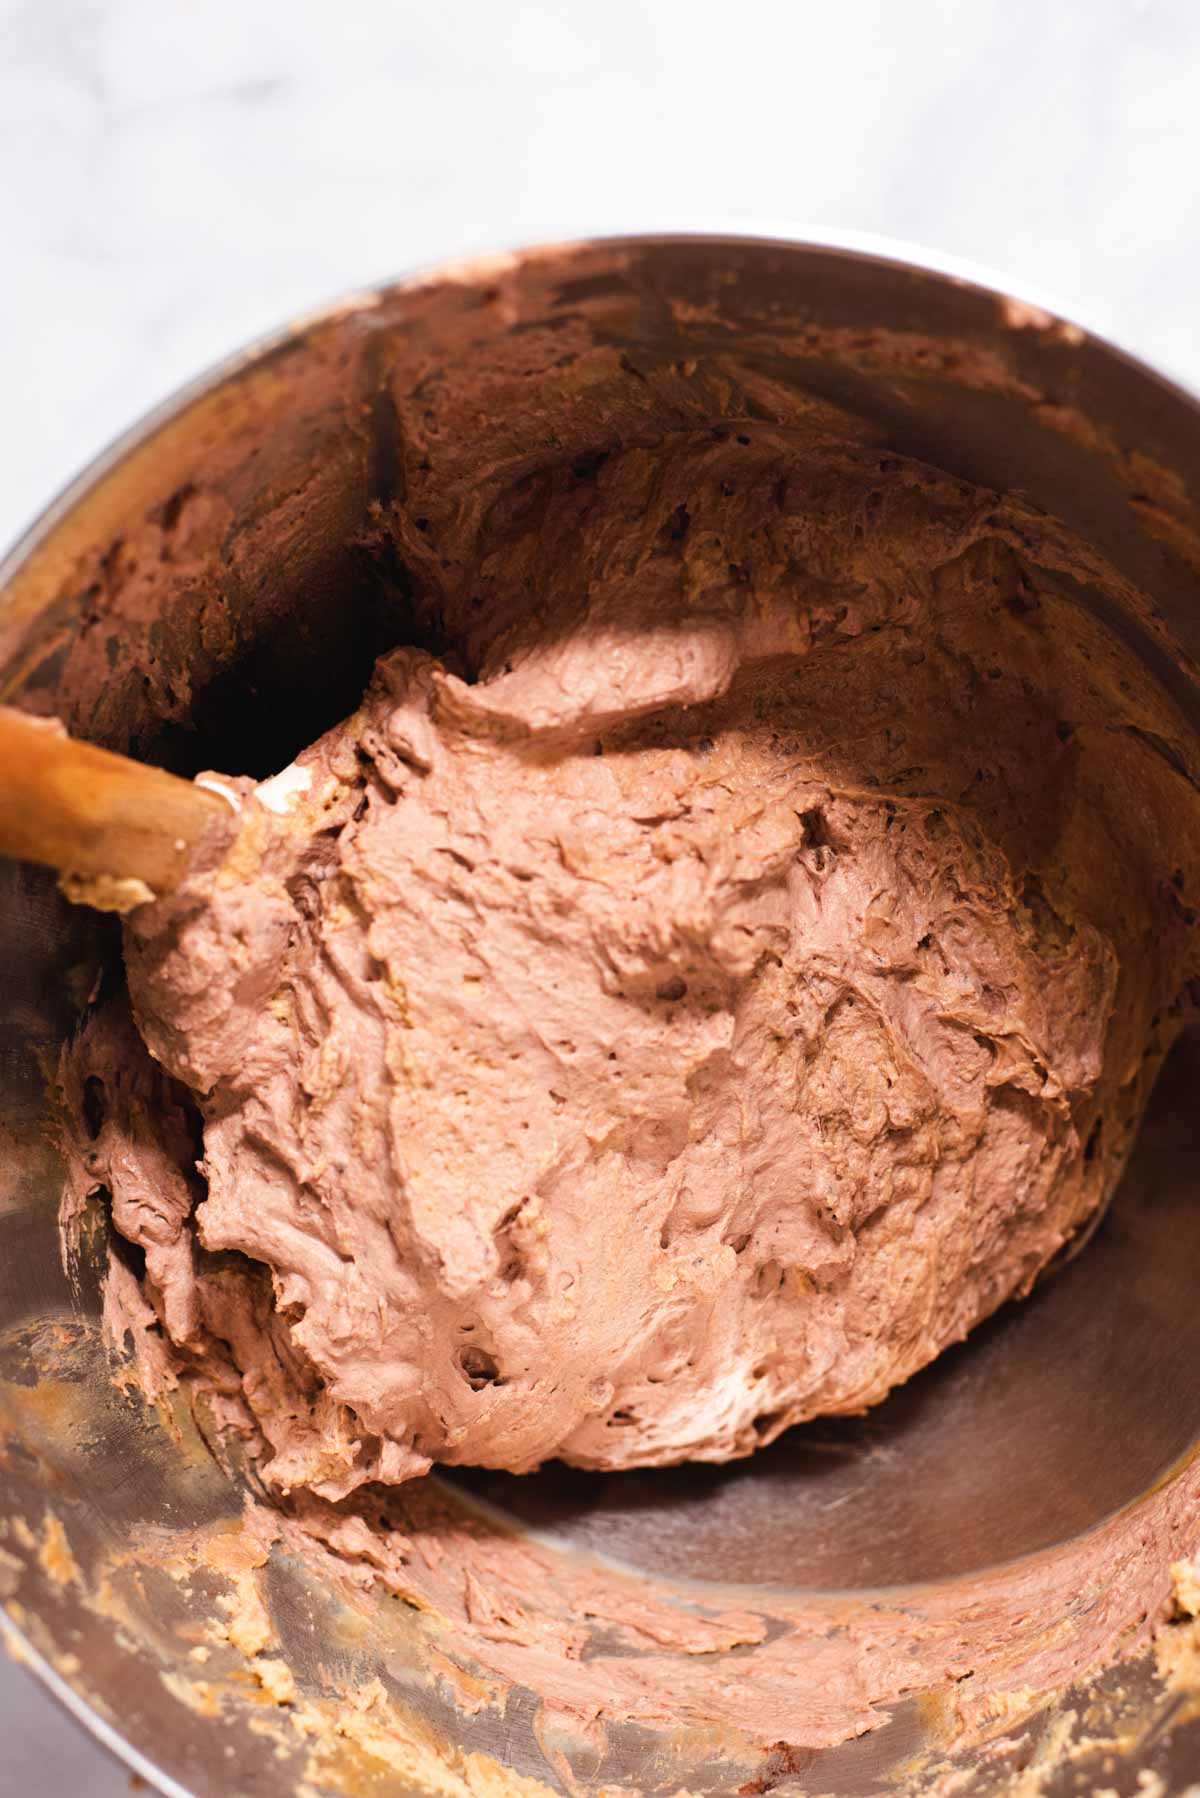
Use a spatula to fold in the chocolate whipped cream until well combined. Be gentle when folding in the whipped cream.
Assembling the pie
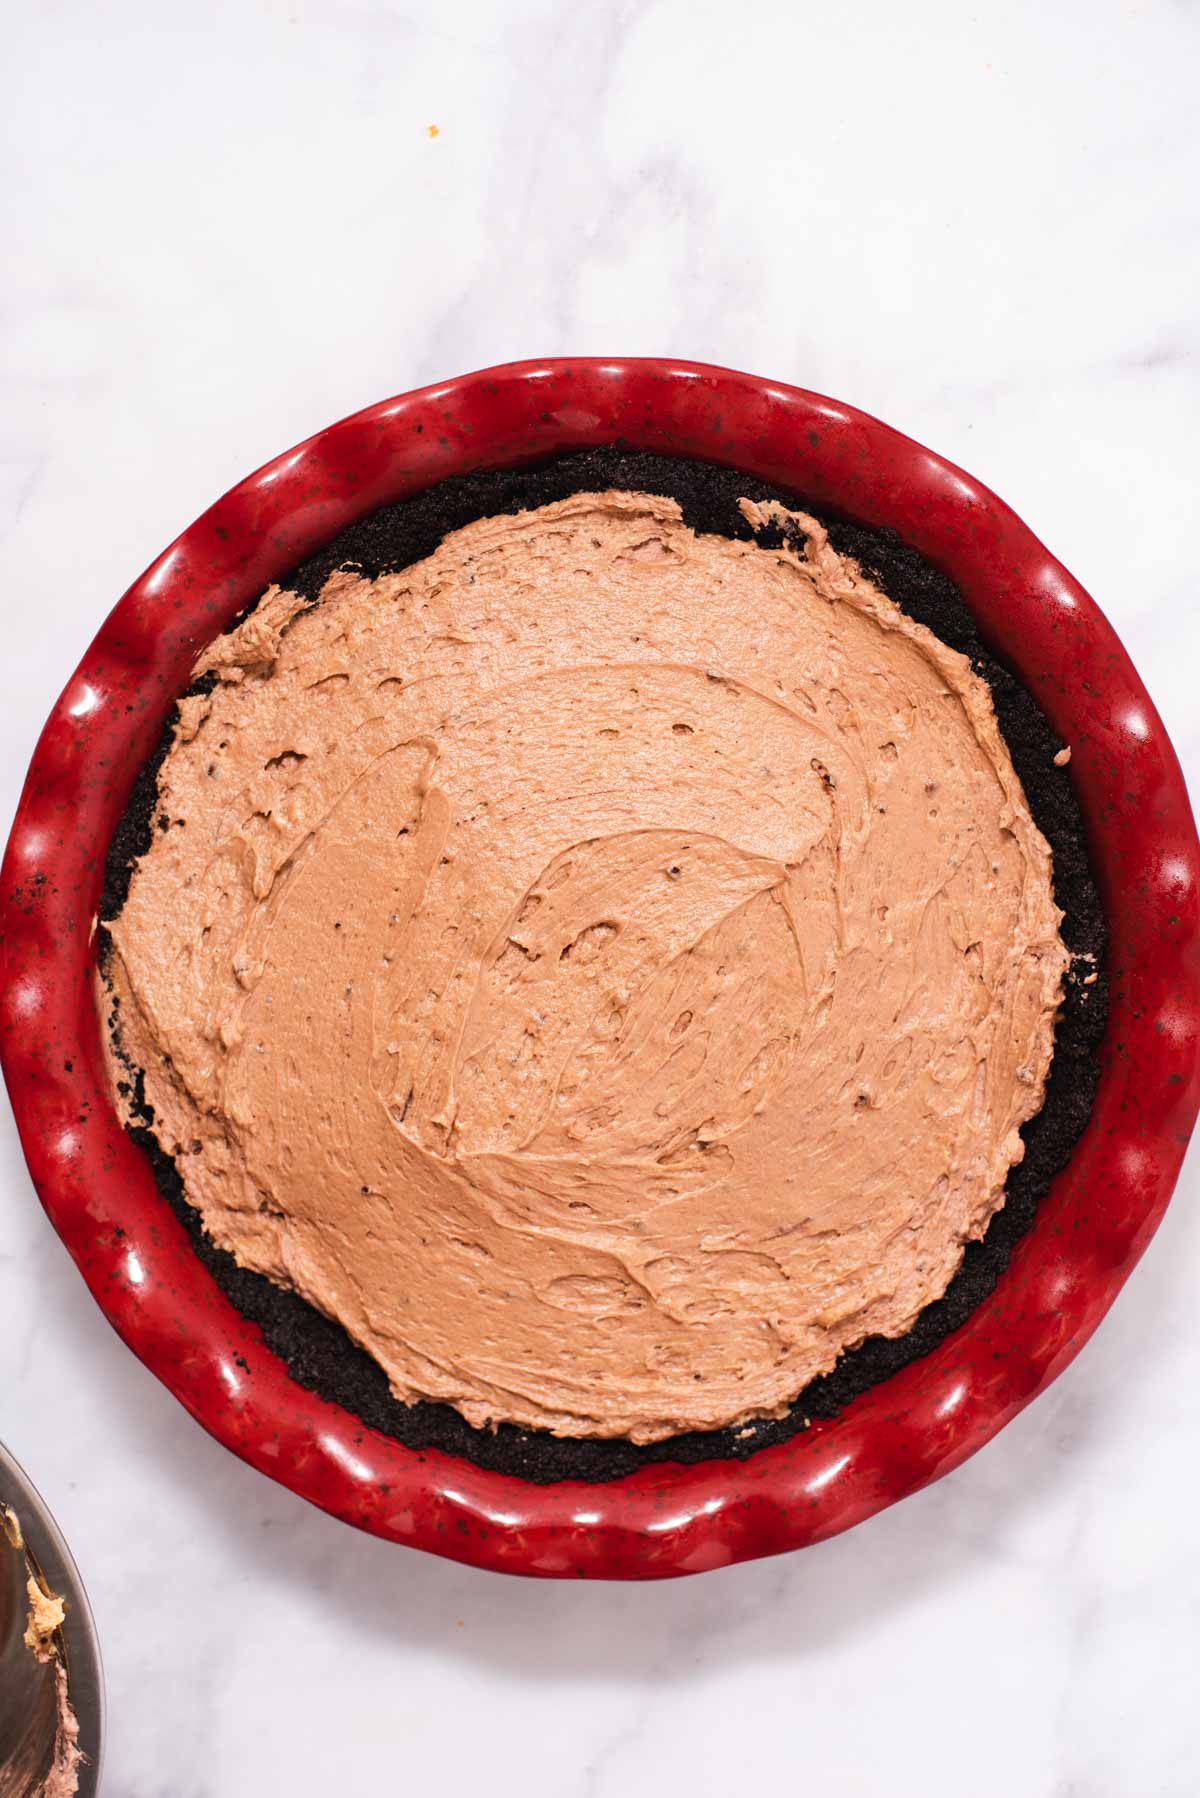
Remove the chilled pie crust from the fridge. Add the filling to the center of the pie, spreading outward to the edges with a spatula until smooth.
Cover and let chill in the fridge for at least 4 hours before serving. You can also put it in the freezer for an hour if you're short on time.
Cassidy's tips
- Softened cream cheese: I set the cream cheese out an hour before I plan to use it to allow it to soften. If you forget to set the cream cheese out in advance, just slice it into a few pieces and pop in the microwave for 30 seconds to soften (don't melt it!).
- Toppings: Feel free to go to town with toppings like more crushed Oreos, melted chocolate, chocolate chips, peanut butter cups, etc... I'll just warn you that this is already a very rich pie!
- Cocoa powder filling: Two tablespoons cocoa powder makes a lightly chocolate-y flavor. Increase to 3 tablespoons for a more significant impact.

Storage notes
- Chocolate peanut butter pie is best served within 1-2 days but will keep for 3-4 days. For best quality, keep covered while in the fridge.
- How to freeze: This pie freezes well for up to 3 months. Make sure to cover it tightly with a lid or foil for best quality. It will thaw quickly when you remove it from the freezer but is really delicious eaten while still frozen.
Looking for more summer desserts?


Did you try this recipe? You can leave a star rating in the recipe card or a review in the comments below. Or check out my cookbook and keep up to date with my YouTube, Instagram, TikTok, or newsletter!
Recipe
Want to Save This Recipe?
Enter your email & I'll send it to your inbox. Plus, get great new recipes from me every week!
By submitting this form, you consent to receive emails from Cozy Peach Kitchen

Chocolate Peanut Butter Pie
Ingredients
Oreo Crust
- 24 Oreo cookies
- 4 tablespoons melted butter
Peanut Butter Filling
- 1 cup heavy whipping cream see note #1
- 2 tablespoons powdered sugar
- 2 tablespoons cocoa powder
- 8 ounces cream cheese softened at room temperature
- 1 cup peanut butter
- ¾ cup powdered sugar
- 2 ounces baking chocolate optional
Instructions
Oreo Crust
- Add oreos to a food processor. Pulse until the oreos are broken down into crumbs. Transfer to a medium bowl with 4 tablespoons melted butter.
- Stir together butter and oreos with a fork until mostly combined. Transfer to a 9" pie plate and pat into an even layer on the bottom and up the sides of the dish to form a crust. Refrigerate for at least 15 minutes before using to allow the oreos and butter to firm up.
Filling
- In a stand mixer with the whisk attachment, add 1 cup of heavy whipping cream. Whip on medium-high speed until you reach soft peaks, about 1.5 to 2 minutes. (Soft peaks: the cream can mostly stand up on its own but falls over at the top).
- Stop the mixer and sift in the 2 tablespoons powdered sugar and cocoa powder. Continue whisking on medium-high speed until you reach stiff peaks. The whipped cream will hold its shape when lifted up but still be light and fluffy. Gently transfer whipped cream to a bowl and place in the fridge until ready to use.
- To the same bowl you used to make the whipped cream, add the cream cheese and peanut butter. You don't need to clean out the bowl between steps. Cream together on medium speed until smooth and fluffy, scraping down the sides as needed.
- Add the remaining ¾ cup powdered sugar and mix until well combined.
- Once combined, use a spatula to fold in the chocolate whipped cream. Remove the chilled pie crust from the fridge. Add the filling to the center of the pie, spreading outward to the edges with a spatula until smooth.
- Optional: To melt the chocolate, add one inch of water to a small to medium sauce pot over medium heat. Once simmering, place a heat safe bowl on top to make a hot water bath. Add the chocolate to the glass bowl. Stir until melted.
- Use a spatula to drizzle chocolate across the top of the pie (optional). Cover and let chill in the fridge for at least 4 hours or freeze for 1 hour before serving.
Video
Notes
- Heavy whipping cream works better for whipped cream than heavy cream because it's higher in fat.
- Peanut butter: Choose a traditional peanut butter (one that doesn't have oil separation). The oil separation in natural peanut butter can affect the texture of the pie.
- Cocoa powder can be omitted for a classic peanut butter pie instead of chocolate peanut butter pie.
- Storebought graham cracker or Oreo pie crust can be used in place of homemade.
- Storage: For best quality serve within 1-2 days. Keeps for up to 3-4 days.
- Freezing instructions: This pie freezes well for up to 3 months. Cover tightly with a lid or foil before freezing. When ready to eat it will thaw quickly at room temp but is delicious eaten frozen.
 Check out my YouTube video above where I share step by step instructions on how to make chocolate peanut butter pie.
fat tiger ready-to-eat momos says
loved it.
Cassidy Reeser says
Thank you!
Stacey says
Delicious! It works very well when you want to make it a day in advance since it seems even creamier the next day.
Cassidy Reeser says
Thanks for the review! It is definitely good leftover 🙂