


Celebrate the best of fall comfort food with this creamy butternut squash mac and cheese with garlicky, crispy collard greens! This vegetarian butternut squash mac and cheese uses fresh butternut squash to make a smooth and cheesy sauce.

This post is sponsored by Nature’s Greens. All thoughts and opinions are my own.
Mac and cheese is one of my all time favorite foods (think gouda mac and cheese and white cheddar mac and cheese!), but sometimes I like adding extra flair and nutrition to it with fresh produce.
This recipe uses a handful of fresh fall ingredients like butternut squash and Nature's Greens collard greens. Collards are one of my favorite leafy greens to add to classic comfort food dishes because they’re versatile and nutrient-dense.
The best part is that, unlike most collard greens recipes, these are ready in just 5 minutes! You’ll want to put these garlicky and crispy collards on more than just mac and cheese.
Jump to:
Ingredients

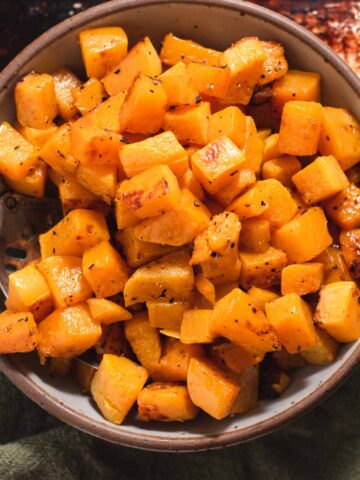
- Butternut squash: Try buying pre-sliced squash to save time on prep, or check out my guide to roasting butternut squash. Roasting the squash concentrates the flavors and makes the dish extra delicious.
- Rigatoni: Macaroni and cheese traditionally uses short pasta like elbow, but I love using rigatoni for its texture and appearance. You can use whatever pasta you have on hand if you’re in a pinch.
- Milk: Whole milk is my go-to in mac and cheese but you can also use unsweet, unflavored plant milk like soy, almond or oat milk.
- Garlic powder, onion powder, salt
- Cheddar cheese: I recommend using mild or sharp cheddar cheese. I found that the flavor of very sharp cheddar doesn’t work as well.
Crispy collards
Collards are traditionally served as stewed greens like in this Instant Pot collard greens recipe, or even in salads like with this collard greens salad. I think they are best tossed with olive oil and garlic and sautéed until nice and crispy.
I love using Nature’s Greens collards because they come pre-sliced in the perfect bite-sized pieces for this recipe. In addition to taking this dish to the next level, dark leafy greens are a good vegetarian source of iron.
Just like kale, collards crisp up well in a cast iron pan while retaining most of their structure. This leaves a bit of a bite and adds great texture to this otherwise very creamy dish.
In this recipe the collard greens are tossed in olive oil and massaged for a minute to soften the greens. This can make them easier to digest and it allows them to cook more quickly.

To make the crispy collard greens, add the greens to a hot cast iron with minced garlic and coarse sea salt. Sauté for 4-5 minutes, turning about halfway through to allow even cooking.
The greens are ready when they are blistered and a little crisp but still bright green.
Step-by-step instructions

There are just a few simple steps to making the mac and cheese. It’s as easy as:
- Cook the rigatoni until al dente.
- Make the butternut squash mac and cheese sauce. Combine all sauce ingredients, except for the cheddar cheese, in a food processor and blend until smooth.
- Heat the sauce. Add the blended sauce and cheddar cheese in a small sauce pot over medium heat. Cover and stir occasionally until the cheese is melted.
- Toss the rigatoni with the sauce.
- Stir crispy collards into the butternut squash mac and cheese. I also recommend adding additional collard greens to the top of each serving as a garnish.
Storage and serving ideas
- Keep refrigerated in a closed container for 3-4 days. Reheat on the stove over medium heat until warmed through or pop into the microwave. You can re-crisp the collard greens by sautéing them in a pan over medium-high heat for 2-3 minutes.
- Make your meal extra hearty by adding a sweet potato dinner roll or whole wheat garlic knot.
- Have leftover butternut squash? Make extra roasted butternut squash to add to tacos, or use it in place of sweet potato in these sweet potato black bean burgers.

More butternut squash recipes
Looking for similar recipes? You might like this roasted butternut squash pasta my vegan mac and cheese (I also have an Instant Pot vegan macaroni and cheese!) For a more classic recipe, try my white cheddar mac and cheese.
Did you try this recipe? You can leave a star rating in the recipe card or a review in the comments below. Or check out my cookbook and keep up to date with my YouTube, Instagram, TikTok, or newsletter!
Recipe
Want to Save This Recipe?
Enter your email & I'll send it to your inbox. Plus, get great new recipes from me every week!
By submitting this form, you consent to receive emails from Cozy Peach Kitchen

Crispy Collard Greens & Butternut Squash Mac and Cheese
Ingredients
- 1 pound butternut squash cut into 1 inch cubes
- 3 tablespoons extra virgin olive oil divided
- ½ teaspoon coarse salt divided
- 8 ounces dry rigatoni
- 2 cups whole milk
- ½ teaspoon onion powder
- ½ teaspoon garlic powder
- ½ teaspoon freshly ground black pepper
- 1 cup shredded sharp cheddar
- 4 cups collard greens cut into 1 inch strips
- 2 cloves garlic minced
- red pepper flakes for serving, optional
Instructions
- Preheat the oven to 400 degrees F.
- Place cubed butternut squash on a baking sheet. Drizzle with 1 tablespoon olive oil and ¼ teaspoon coarse salt. Toss with clean hands to evenly coat. Bake at 400 degrees for 30 minutes, turning halfway through. The squash is ready when soft and golden.
- While the squash is roasting, cook rigatoni according to package instructions. When finished cooking, drain and set aside.
- To make the sauce: Combine roasted butternut squash, whole milk, onion powder, garlic powder and black pepper in a food processor. Process at high speed until smooth. Transfer to a medium sauce pot and place over medium heat. Add shredded cheddar. Heat until cheese is melted and sauce is warmed through.
- To make the crispy collards, heat a large skillet over medium-high heat. Toss the greens in two tablespoons of olive oil and massage with clean hands for one minute. Add greens, minced garlic and ¼ teaspoon coarse salt to the skillet. Sauté for 4-5 minutes, turning about halfway through to allow even cooking. The greens are ready when they are blistered and a little crisp but still bright green.
- Toss rigatoni, sauce and crispy collards together. Serve topped with additional black pepper and red pepper flakes to taste.
Notes
- I use pre-sliced bags of collard greens, which are about 1-2 inches wide. Roughly hand-torn collard greens also work.
- Keep refrigerated in a closed container for 3-4 days. Reheat on the stove over medium heat until warmed through or pop into the microwave. You can re-crisp the collard greens by sautéing them in a pan over medium-high heat for 2-3 minutes.
Comments
No Comments