

This oil pie crust recipe is an easy low-stress pie dough that requires minimal prep. Use this recipe when you're looking for a vegan pie crust that doesn't use butter! It's delicious with sweet and savory pies.
When it comes to comfort food cooking, there's no getting out of knowing how to make a pie crust. I feel like pie is like the most elevated form of a casserole (which is one of my favorite kinds of comfort food): not only do you get a well rounded meal, or dessert, in one slice, but that slice is surrounded by flaky, indulgent pie crust.
Oil pie crusts are easy to work with because, unlike butter, the fat is already melted. This means that it incorporates into the flour more easily than a solid fat does. The end result is still a flaky, delicious, and satisfyingly rich crust.
Here's how to make a perfect oil pie crust that's flaky, easy to make, and just plain hard to get wrong!
This post contains Amazon affiliate links. As an Amazon associate I earn from qualifying purchases; read my disclaimer policy for more information.
The Components of an Oil Pie Crust
Oil
Most oils that are liquid at room temperature work well in this pie crust recipe. Oils with a neutral flavor, like canola or vegetable oil, work best in pie crust.
Olive oil works in pie crust, but it may impart a slightly olive oil flavor to final product. Be sure that you're not heating the crust to over 375 degrees Fahrenheit, as this is the smoke point of many olive oils.
The takeaway: for a basic pie crust choose an oil that has a neutral flavor.
Flour
Low protein flours work best for pies because they yield a more tender crust. The higher the protein content of the flour, the tougher the dough.
- Pastry flour (8-10% protein) for a super tender pie crust, but it is more delicate and may be a bit more difficult for beginners to handle.
- All-purpose flour (11-12%) is a good middle-ground flour and also works well for pie crust. This is my favorite flour that is only available in the south (or online!).
- Bread flour (~13-14% protein) yields a tougher result, so I don't recommend bread flour for this recipe.
- Whole wheat flour will make a more grainy, crumbly texture. Because of this, it's trickier to work with whole wheat flour.
The takeaway: All-purpose flour is usually your best bet for a standard oil pie crust for beginners.
Salt
The primary role of salt is to contribute flavor to the crust. While it does contribute a bit to gluten formation, it's most noticeable effect is in taste.
The takeaway: Salt enhances the flavor of pie crust; use as little or as much as you prefer.
Water
Ice cold water is used in pie crust because cold water makes the pastry dough easier to work with. Add the ice water one tablespoon at a time, as the amount of liquid needed will vary based on kitchen conditions like humidity and temperature.
For actually ice cold water, add a few ice cubes to a bowl (or glass) or water and scoop water out from the dish a tablespoon at a time as you add it to the dry ingredients.
Making the Crust
The secret to rolling oil pie crust
Okay, maybe this isn't a secret. People have definitely been doing this for years. Personally speaking, my grandma has been doing this for years. Back in high school I tasked my grandparents with mailing me five of their favorite recipes.
One of those recipes was my grandma's "Pat in Pat Oil Pie Crust" (because you would pat the pie crust into place in the pie dish). This recipe is a little different, but is based on the same secret ingredient:
Wax paper!
Simply place your pie dough between two pieces of wax paper before rolling it out. This is the wax paper that I use.
No extra flour means no extra gluten formation, which means tender, flaky pie crust. No direct contact with the rolling pin means no pie dough sticking to the rolling pin! Be amazed as your pie crust comes off of the wax paper easily as can be.
Okay, that's enough about oil-based pie crust for now. Check out my tried and true recipe below! It works well for sweet and savory recipes alike.
The steps to making an oil based pie crust
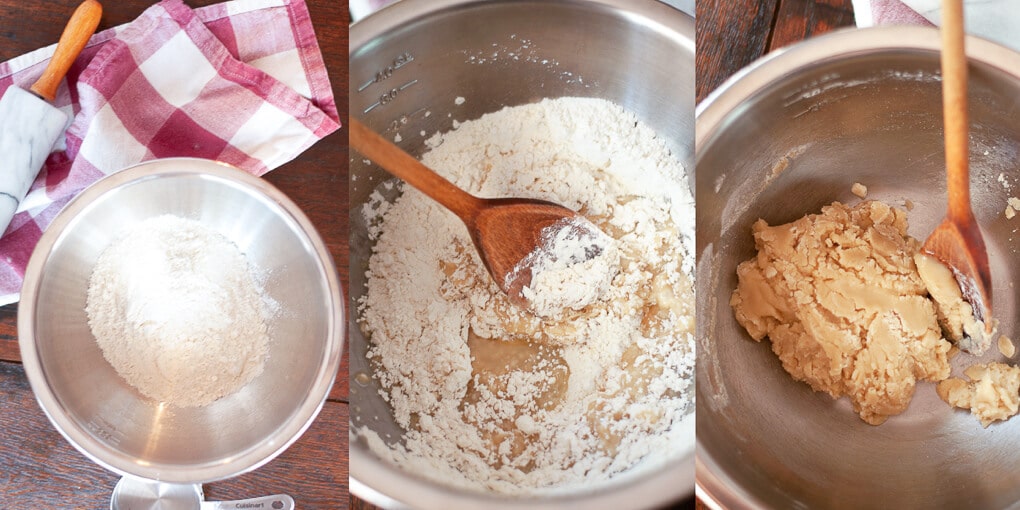
Combine the dry ingredients (flour, salt) in a medium mixing bowl (this is my go-to mixing bowl set). In a small bowl or liquid measuring cup, add the oil and 5 tablespoons of ice water. Pour the liquids into the dry ingredients.
Mix together with a wooden spoon until a rough ball forms; add additional 1 tablespoon of ice cold water if it is too crumbly.
Divide into two evenly sized dough balls. Cover and let rest in the fridge for at least 15 minutes. Place each dough ball between a large sheet of wax paper (at least 12 in x 12 in).
Roll out with a rolling pin until the dough is 12x12 inches. I prefer to use a marble rolling pin like this one.
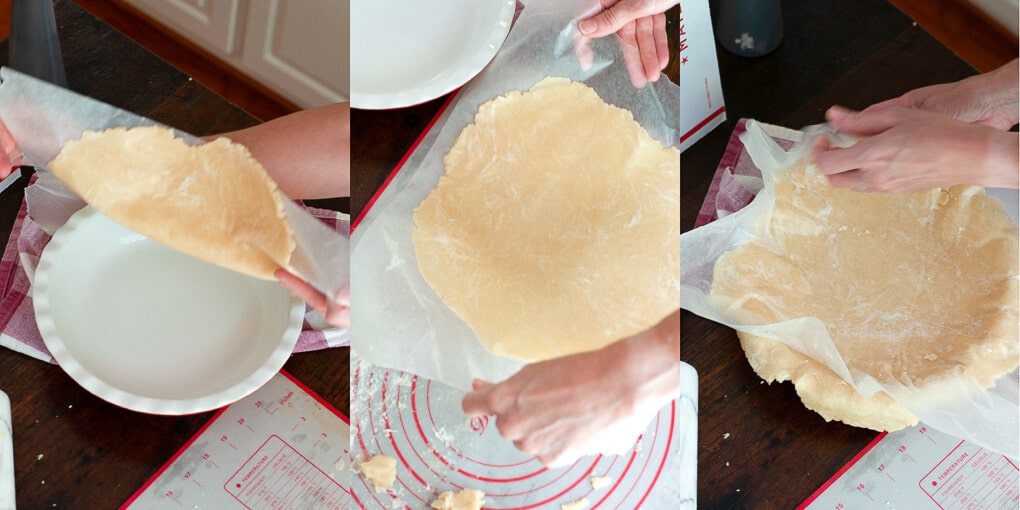
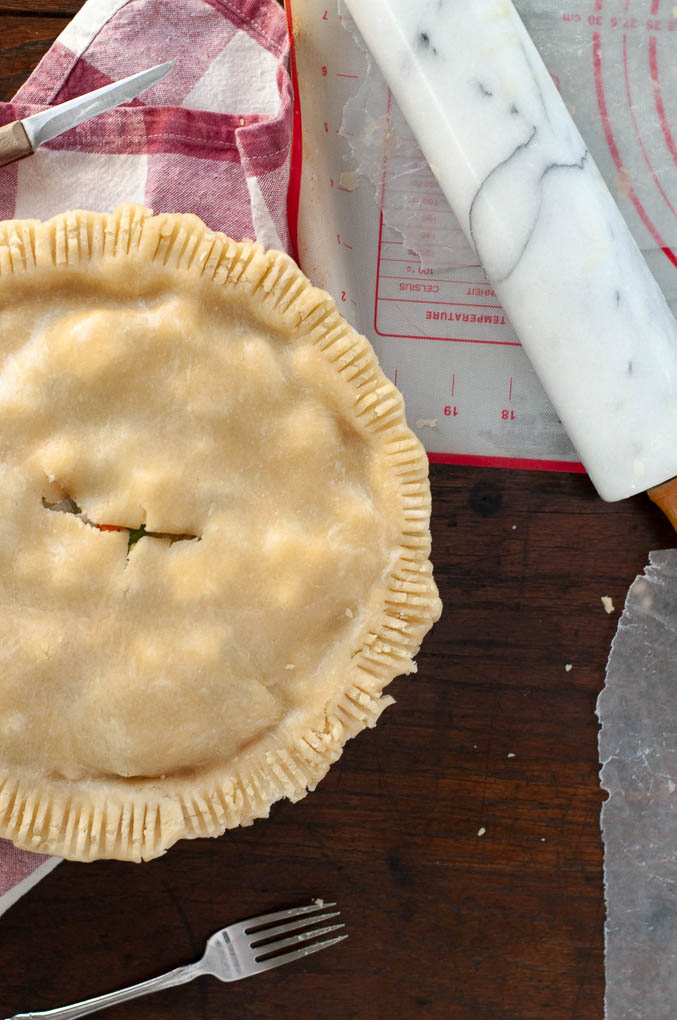
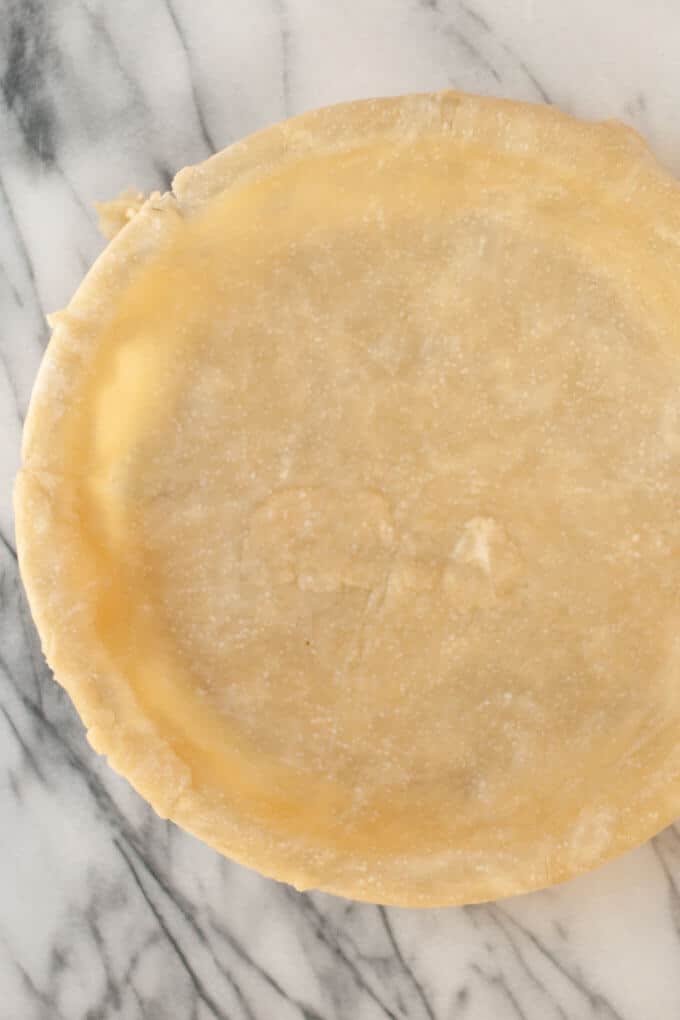
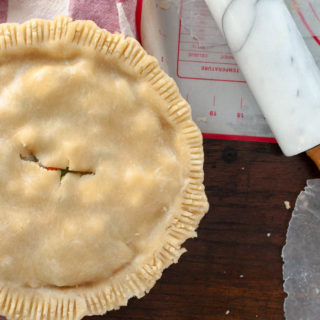
Invert the wax paper and center the pie dough on a pie dish. Carefully peel the wax paper off of the dough (as seen above). Cook according to your recipe instructions.
One of my favorite ways to use this crust is in my Vegan Pot Pie with Tofu and Veggies. It also makes a great vegan pumpkin pie crust!
Recipe
Want to Save This Recipe?
Enter your email & I'll send it to your inbox. Plus, get great new recipes from me every week!
By submitting this form, you consent to receive emails from Cozy Peach Kitchen
How to Make a Perfect Oil Pie Crust
Ingredients
- 2 and ½ cups all purpose flour
- 1 teaspoon salt
- ⅔ cup canola or vegetable oil
- 6 tablespoons ice cold water
Instructions
- Combine flour and salt in a medium mixing bowl. In a separate mixing bowl, combine the oil and 5 tablespoons of ice cold water; don't mix the liquids together.
- Add liquids to the flour and salt mixture. Stir with a fork until a ball forms; add 1 tablespoon of ice water if it is very crumbly and not holding. It is okay if the dough is not totally cohesive (some crumbles may exist).
- Divide the dough into two equally sized balls. Place in an airtight container and let rest in the fridge for at least 15 minutes.
- For one pie crust, place the dough ball between two pieces of wax paper. Use a rolling pin (I recommend using a marble one like this) to roll out until it reaches 12 inches in diameter.
- Carefully peel the top layer off of the wax paper. Invert the pie crust into a pie plate and carefully peel the wax paper off of the dough.
- Bake the pie dough according to pie recipe.
Notes
- Recipe makes 2 12" pie crusts. I usually use a 9" pie plate for baking, but you can also use disposable containers. Do note that different materials will bake the crust at different rates.
- These are my favorite glass mixing bowls.
- Pie dough can be frozen in an airtight container. Let thaw fully in the refrigerator prior to using.
- I have made this recipe several times without wax paper and I don't find the result as satisfying. This dough can be made without the wax paper step, but you will likely have to pat the crust into the pan with your fingers instead of transferring the pie crust in one piece.
- Calorie calculations reflect 6 servings for each pie crust, or 12 total servings.
Amber says
Have you ever tried making fried pies with this crust; and, if so, how did they turn out? I am looking for a pie crust recipe that makes fried pies that don't fall apart while cooking.
Cassidy Reeser says
I've never tried it, I've only ever baked it. You could tear off a small piece of the crust and try frying it without anything in it to see how it holds, so that you don't potentially waste any filling. Hopefully someone else sees this comment and replies!
Pam McC says
I had to post
The recipe was so easy your instructions were spot on. This was my first time making this kind of crust
It turned out perfect easy to make roll and bake
Thank you!
Cassidy Reeser says
Awesome! Glad it worked well for you, thanks for trying out my recipe 🙂
Liz says
This recipe surprised me in the best way! I was initially worried it wouldn’t bake up properly (made a strawberry-Rhubarb pie) but it turned out amazing! Will definitely have to use this recipe again!
Katharine says
Cassidy, I have been looking for this recipe. The oil based pie crust is the only recipe I have ever been successful at making. Thank you for posting this.
Marian says
I have always used the NY Times Cookbook pastry crust recipe which is perfect. However, I decided that vegetable shortening does not fit with my healthy vegetarian lifestyle so I tried your recipe. I followed the recipe exactly. It was PERFECT! Thank you so much! This will be my new "go to" pie crust recipe.
Cassidy Reeser says
Awesome! Thanks for the review 🙂
Gail says
This is by far the best pie crust that have ever made. The only reason that I looked for this recipe is because my husband should not have fats that solidify. I didn’t know that you could make a pie with vegetable oil. Amazing how easy, and the flakiest!
This will be my go to recipe from now on.
New cook says
The recipe has no cooking temp...
Cassidy Reeser says
The temp varies based on the recipe that you are using the pie crust for. However, I recommend doing 350F if you aren't following a recipe. Enjoy!
Carol says
Just finished eating tomato quiche made with your recipe. It’s amazingly easy and quick, so very flakey and light, and the best pie crust I’ve made. I used organic first cold pressed sunflower oil.
Cassidy Reeser says
That sounds delicious! I'm happy to hear that it worked well with sunflower oil.
Janice says
I’ve always used an oil crust recipe, but my recipe I used called for only 2 c. flour and 1/2 c. oil and 5 tbls of water.
I think yours makes me a bit bigger thicker crust which I like.
My problem when I put it in the fridge in a closed container and when I get it out the oil has separated from the 2 balls of dough. I have fixed that by breaking up the balls and incorporating back in to them the oil that had separated.
Then my next problem is that when I bake my crust at 425 for 15 minutes then 375 for 40 to 50 minutes.
This Ive always baked my pies this way, but my pie came out very very dark.
One thing I have to mention is I do like my mother in law always did which is I add 1 tsp. Of baking powder to the recipe of the dough.
She always said that it made the dough flaky.
What could I be doing wrong to have the oil separate and the crust turn so dark.
I must say the recipe I used to use with less flour and oil that was a recipe that my mother in law gave me she got it from a low cholesterol cookbook and hers always turned out perfect, but I don’t know if she ever put hers in the fridge to cool before rolling.
Also I agree with the marble rolling pin thats what I use but also I use the wax paper sleeve from 2 boxes of cereal and this paper doesn’t break down like regular wax paper actually it can be used many times if folded up and stored in a plastic bag.
Rosalyn Simpson says
I love oil pastry
I always have to add much more water. What am I doing wrong.
Cassidy Reeser says
It could be that you are adding too much flour. I always spoon and level flour into the cup instead of scooping it into the bag. It also may have to do with humidity, if you live in a low humidity state you may need a small amount more liquid. But if it's working for you and you're happy with how the crust turns out, I'd keep adding as much water as you need! 🙂
El says
Always been amazed at people who change a well-rated recipe and are then mystified as to why it didn't work for them. Even more baffled as to why they then jump in the comments to advertise their ignorance.
Donna says
The instruction "In a separate mixing bowl, combine the oil and 5 tablespoons of ice cold water; don't mix the liquids together." Does it mean DO NOT mix oil and ice cold water before adding to flour?
The pie crust was hard as rock. I can't figure out what was wrong. Would it be adding too much water while mixing flour (because it was very crumby & I added more water)? Or is it because I added room temperature to the ice so it melts faster? Thanks.
Cassidy Reeser says
It just means you don't have to mix them together before adding to the flour, I don't think actually mixing them together would affect the outcome of the dough. However, this recipe is transcribed from my grandma's original recipe and over the years I've started to second guess the necessity of that instruction. Unlike most of my recipes, which I test multiple ways, this is one I've just always made the same way because it's how she did. Not sure that helps answer the question too much, but that's my rationale!
As far as the pie being hard as a rock, it sounds to me like it actually could have used some more water. Usually pie dough would become too hard after refrigerating if it is exposed to air and dries out, so that's why I'm thinking it may have actually needed more water. Though the temperature of the water could also affect it.
Mary Norberg says
Generational:
This is essentially the recipe my mom used for many decades. Thankfully she passed it along to me. Super forgiving. I used a silicon baking sheet under parchment paper so things don’t slide around while rolling out. I use fingers to press a nice edge. Works like a dream. Evoo hasn’t been a problem w flavor, adds a bit of nice color.
Glad you’ve made this available to another generation of foodies!!!
Cassidy Reeser says
It's lovely to read that others have nice memories of this style of recipe too. Thanks for the comment!
Diane Wisniewski says
I rolled out on wax paper, which started to wrinkle. I switched to parchment paper, which worked much better.
Donna says
I followed instructions, the dough was not crumbly, dough balls were kept in fridge for few hours before rolling. Does it have to be put in between wax paper in order to roll and not touching rolling pin? The dough ball broke apart into pieces. Is it because I put the dough onto tinfoil and rolled with silicone rolling pin? Thanks.
Cassidy Reeser says
The dough is put in the fridge in order for the flour to hydrate and fully absorb the water and oil. Usually, if the dough breaks apart it should stick back together when it's rolled. I don't see any problem with the foil and silicon rolling pin, my guess is that it needed a little more water.
Just a note if anyone else runs into this problem, you can add a teaspoon of water at a time to the dough to bring the crumbly bits back together. I hope you were still able to get the crust to work out!
Donna says
The dough ball didn't look dry but broke apart when rolled. I was able to use it as-is, it looked like apple crumble pie, still good and very flaky crust after baking. I used your recipe several times with one extra table spoon of ice cold water. Thanks Cassidy.
Alison says
A good basic recipe, it tasted great. I found it didn't roll out to 2x 12" discs. I had to make the quiches smaller. I blind baked them for 15 minutes first, the pastry was crunchy but not hard. Thanks very much! 🙂
Kaylene says
I want to use this for a chilled pie, so I will need to bake it first. What temp do I bake it at and for how long? Thank you!
Cassidy Reeser says
Hi! Here's what I would do: Bake it at 350F and start with 30 minutes, but it may need up to an hour (It's been a bit since I've baked this without a filling, so I can't remember the exact time range). Just look for the crust to be golden brown. While baking, weigh the crust down with parchment paper and any kind of weight (I use use dry beans or even dry rice). The will keep it from puffing up as it bakes. Best of luck!
Diane Cammer says
Have not tried but going too.
This recipe uses less oil then on Foodnetwork. This sound better and not as greasy.
S Andrews says
I used this recipe for a beef pie (left overs from a prime rib dinner). I have raved to all my friends how wonderful the crust turned out. No soggy bottom, light, flakey and melted in my mouth. I am thankful a recipe directed me to your recipe and I’m grateful you took the time to share the recipe.
Busy mom says
This is a light flaky crust and easy to make. Great for pies, cobblers, any dish you make with a crust.